Quick Answer: A healthy Christmas Cactus has firm, glossy, deep-green stem segments, plump texture, and new growth emerging from the tips. If yours looks limp, wrinkled, yellowed, or is dropping buds, something in its environment is off — but most problems are fixable once you know what to look for.
Wondering whether your Christmas Cactus looks like it’s doing well — or quietly struggling — is a smarter question than it sounds. Unlike a wilting pothos or a crispy fern, Schlumbergera stress creeps in slowly before it becomes obvious. The good news: once you know what healthy looks like, diagnosis gets much easier.
Does Your Christmas Cactus Look Like It’s Doing Well? Start Here.
The Healthy Christmas Cactus at a Glance
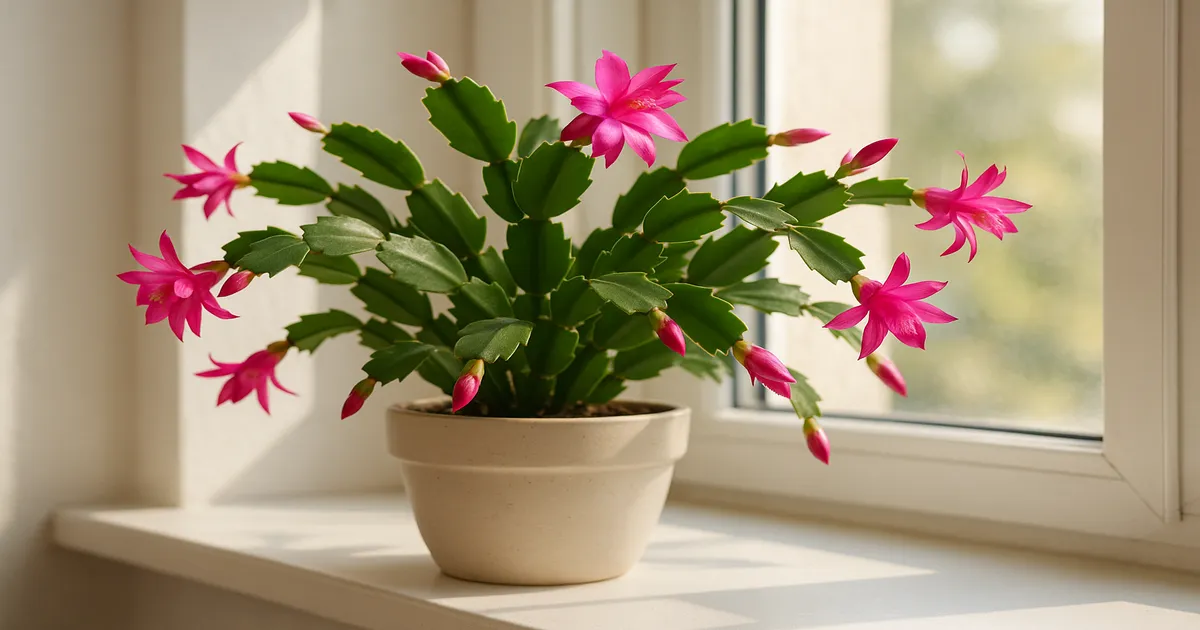
A thriving Christmas Cactus is all about its stem segments, called phylloclades. They should be flat, firm, and glossy — a rich, uniform green with only a faint reddish tinge at the tips in bright light. New segments pushing out from the tips are a clear sign of active, happy growth. During bloom season, buds should open fully without dropping.
| Feature | Healthy Indicator |
|---|---|
| Stem segments | Firm, glossy, flat, and plump |
| Color | Deep, uniform green (slight red tipping is normal) |
| New growth | Small bright-green segments at stem tips |
| Roots | White to tan, firm, filling but not bursting the pot |
| Blooms | Abundant, fully open, vivid color |
| Soil | Moist but never waterlogged between waterings |
Thanksgiving Cactus vs. True Christmas Cactus — Does It Matter?
Roughly 80% of plants sold as “Christmas Cactus” are actually Schlumbergera truncata — the Thanksgiving Cactus, which blooms in November and has pointed, tooth-like edges on its stem segments. The true Christmas Cactus (S. bridgesii) has scalloped, rounder edges and blooms in December–January. For health assessment purposes, care requirements and warning signs are essentially identical, so everything here applies to both.
What a Truly Healthy Christmas Cactus Looks Like
Stem Segments: Color, Texture, and Firmness
These plants are epiphytes — they evolved in the humid cloud forests of southeastern Brazil, growing on trees and rocky outcroppings at 3,000–5,900 feet elevation. That origin matters. They are nothing like a desert cactus. They use a modified form of CAM photosynthesis that gives them some drought tolerance, but they still need consistent moisture and humidity to look their best.
Healthy phylloclades feel almost leathery-firm and carry a light sheen. Press one gently — it should give slightly and spring back. Dull, soft, or wrinkled segments are your first red flag.
Root Health: What to Look For
Healthy roots are white to tan, firm, and slightly fuzzy. They should fill the pot without circling aggressively or pushing out of the drainage holes. Brown, slimy, or foul-smelling roots mean rot has set in. You don’t need to unpot the plant to check — tip it gently and look at what’s emerging from the drainage holes. Dark, mushy roots warrant a closer look.
New Growth and Blooming as Positive Indicators
Active new growth — tiny, bright-green segments pushing from stem tips — is one of the clearest signs your plant is thriving. Blooms that open fully and hold for several days (rather than dropping as buds) confirm that light, temperature, and humidity are all in a good range. With proper care, these plants can live 20 to 100+ years, so getting the basics right now pays off for decades.
Common Reasons Your Christmas Cactus Doesn’t Look Well
Overwatering and Root Rot
This is the number-one killer. Epiphytic roots need oxygen — soggy soil creates anaerobic conditions where Pythium, Phytophthora, and Fusarium fungi thrive. The cruel irony: a rotting plant looks like it needs water — limp, pale, and wilting. But the segments will be mushy and translucent, not just soft, and the soil may smell sour.
Underwatering and Drought Stress
An underwatered Christmas Cactus wrinkles. The stem segments lose turgor pressure and collapse inward. The key distinction: underwatered segments are wrinkled but firm, while overwatered segments are mushy and translucent. You may also see reddish or purplish tinting as the plant produces stress pigments called anthocyanins.
Too Much or Too Little Light
Christmas Cacti evolved under a forest canopy and thrive in bright indirect light (1,500–3,000 foot-candles). Direct sun bleaches the phylloclades — expect yellowing, reddish-orange discoloration, or papery, crispy patches. Too little light causes the opposite: new growth becomes pale, elongated, and spindly (etiolation), and the plant rarely blooms.
Temperature Extremes and Cold Drafts
Ideal growing temperatures are 65–75°F (18–24°C). Cold drafts from windows or AC vents cause localized tissue damage and trigger bud blast — a stress response where the plant drops its buds via ethylene gas production before they open. Hot drafts from heating vents cause rapid moisture loss. Brown or black patches near windows, or sudden bud drop, are the telltale signs.
Low Humidity
Indoor air in winter can drop to 20–40% relative humidity. This plant’s native habitat regularly sits above 80% RH. The result is dull, slightly wrinkled segments despite adequate watering, crispy tips, and premature bud drop. Aim for 50–60% RH at minimum; 60–70% is ideal.
Nutrient Deficiency or Fertilizer Burn
Pale overall color with slow growth points to nitrogen deficiency. Yellowing between the veins on new growth (interveinal chlorosis) usually indicates iron deficiency, often caused by soil pH that’s too high locking out available iron. White crusty deposits on the soil surface signal salt buildup from over-fertilizing or hard tap water. Target a soil pH of 5.5–6.5 for proper nutrient uptake.
Pest Infestations
| Pest | Visual Signs |
|---|---|
| Fungus gnats | Tiny flies at soil surface; larvae damage roots |
| Spider mites | Fine webbing; bronze, stippled segments |
| Mealybugs | White cottony masses at stem joints |
| Scale insects | Brown bumps on stems; sticky residue |
| Root mealybugs | Wilting despite good care; white waxy coating on roots |
Pot and Soil Problems
Christmas Cacti prefer being slightly pot-bound. Overpotting means excess soil retains moisture long after the roots have taken what they need, which invites rot. Standard potting soil is too dense for epiphytic roots — it holds too much water and not enough air. Soil that stays wet for more than 7–10 days is a problem.
How to Diagnose Your Christmas Cactus Step by Step
Step 1: Check the Stem Segments First
Start with what you can see. Glossy and firm = healthy. Mushy = likely overwatering. Wrinkled but firm = likely underwatering or low humidity. Bleached or papery = too much direct sun. Pale and elongated = not enough light.
Step 2: Inspect the Soil and Roots
Stick your finger 1–2 inches into the soil. Still damp a week after watering? Drainage is poor. A soil moisture meter gives a more reliable reading than guesswork — the XLUX Soil Moisture Meter is a reliable, inexpensive option. If the soil is bone dry and pulling away from the pot edges, you’ve been underwatering. Tip the plant out if you suspect root rot: healthy roots are white to tan and firm; brown, slimy, or absent roots confirm the problem.
Step 3: Assess Light, Temperature, and Humidity
A foot-candle meter can confirm whether your plant is getting the 1,500–3,000 foot-candles it needs — the Dr.meter LX1330B is a solid, affordable choice. Check for nearby drafts by holding your hand near windows and vents. A small hygrometer will tell you whether humidity is the culprit; the Govee Indoor Humidity Sensor is accurate and easy to read.
Step 4: Look for Pests at Joints and on Roots
Use a magnifying glass and check the joints between stem segments — mealybugs and scale hide there. Look for fine webbing (spider mites) and check the soil surface for tiny flying insects (fungus gnats). If the plant is wilting despite good care, unpot and check roots for the white waxy residue of root mealybugs.
How to Fix a Christmas Cactus That Doesn’t Look Well
Treating Overwatering and Root Rot
- Remove the plant from its pot and shake off the old soil.
- Trim all brown, mushy roots with sterile scissors.
- Dust cut ends with powdered cinnamon or sulfur, or rinse with a diluted hydrogen peroxide solution (1 part 3% H₂O₂ to 3 parts water).
- Repot into fresh, well-draining epiphytic mix (see below).
- Hold watering for 5–7 days to let cut roots callous.
- Going forward, water only when the top 1–2 inches of soil are dry.
Rehydrating an Underwatered Plant
Water thoroughly until it drains from the bottom. For a severely desiccated plant, set the pot in a basin of room-temperature water for 20–30 minutes so the soil can reabsorb moisture evenly from the bottom up. Segments should plump back up within a day or two.
Correcting Light Conditions
Move a sun-stressed plant to bright indirect light — an east-facing window is ideal, or a few feet back from a south or west window with a sheer curtain as a diffuser. For a light-starved plant, move it closer to the window or supplement with a full-spectrum grow light set to 12–14 hours during active growth, dropping to fewer than 12 hours in fall to trigger blooming. The Soltech Aspect Grow Light is a popular choice that blends well in living spaces.
Addressing Temperature and Draft Damage
Move the plant away from exterior doors, drafty windows, heating vents, and AC units. Once buds appear, don’t relocate it — even a short trip to a different room can trigger bud blast. Remove cold-damaged segments; healthy tissue will regenerate.
Boosting Humidity Safely
- Place the pot on a pebble tray filled with water, keeping the pot above the waterline.
- Group plants together so their transpiration raises local humidity.
- Use a room humidifier targeting 50–60% RH — the Levoit Classic 300S is a reliable option for a single room.
- Don’t mist directly onto the stems — that promotes fungal disease.
Fixing Nutrient Deficiencies and Salt Buildup
Feed with a balanced 20-20-20 fertilizer every two to four weeks in spring and summer, then switch to a low-nitrogen, high-phosphorus formula (2-10-10) in early fall to encourage bud set. For iron chlorosis, apply chelated iron as a foliar spray or soil drench. Flush salt buildup by running three to four times the pot volume of plain water through the soil every few months.
Eliminating Common Pests
- Spider mites: Spray with diluted neem oil every 5–7 days for three cycles; raise humidity.
- Mealybugs: Dab with a cotton swab dipped in 70% isopropyl alcohol, then follow up with neem oil.
- Fungus gnats: Apply Bacillus thuringiensis israelensis (Bti) as a soil drench; use yellow sticky traps for adults; let soil dry more between waterings.
- Scale: Scrape off manually, then apply horticultural oil spray.
- Root mealybugs: Unpot, rinse roots, treat with isopropyl alcohol, repot in fresh sterile mix.
Repotting Into the Right Soil and Pot
The ideal epiphytic mix: 50% standard potting mix, 25% perlite or pumice, 25% fine orchid bark — target pH 5.5–6.5. Choose a pot only 1–2 inches larger than the current root ball, always with drainage holes. Terracotta is excellent for moisture regulation. Refresh the soil every 2–3 years even if you’re not upsizing.
Keeping Your Christmas Cactus Looking Its Best Year-Round
Watering
Water when the top 1–2 inches of soil are dry during active growth (spring and summer). In fall and winter, let the top 2 inches dry out before watering again. Always use room-temperature water — cold tap water can shock the roots. Rainwater or distilled water is best long-term; fluoride and chlorine in tap water cause tip burn over time. Never let the pot sit in standing water for more than 30 minutes.
Light Through the Seasons
Aim for bright indirect light (1,500–3,000 foot-candles) year-round. From September through November, the plant needs 12–14 hours of completely uninterrupted darkness each night to initiate flower buds. Even a streetlight through the curtains or a lamp briefly switching on can reset the photoperiod clock — which is why so many Christmas Cacti never bloom indoors.
Feeding Schedule
| Season | Fertilizer Type | Frequency |
|---|---|---|
| Spring (March–May) | Balanced (20-20-20) | Every 2–4 weeks |
| Summer (June–August) | Balanced (20-20-20) | Every 2–4 weeks |
| Early Fall (September) | Low-N, high-P (2-10-10) | Once, then stop |
| Bud/Bloom period | None | — |
| Post-bloom rest | None or very dilute | — |
How to Get Your Christmas Cactus to Bloom Again
Christmas Cacti bloom in response to two triggers working together: short days (fewer than 12 hours of light) and cool nights (50–60°F / 10–15°C). Start in early September for December blooms:
- Move the plant to a room that gets no artificial light after sunset — a spare bedroom or closet works well.
- Ensure 12–14 hours of complete, uninterrupted darkness every night.
- Maintain nighttime temperatures of 50–60°F (10–15°C).
- During the day, give it bright indirect light as normal.
- Continue for 6–8 weeks, or until buds form at the stem tips.
- Once buds are visible, move it back to its usual spot — and don’t change its environment again.
Bud blast happens when the plant perceives sudden stress and releases ethylene gas, aborting its buds as a survival response. The most common triggers are moving the plant after buds set, temperature swings, low humidity, drafts, and overwatering. Once it starts, you can’t reverse it for those buds — prevention is everything.
Frequently Asked Questions
Does my Christmas Cactus look like it’s doing well if it’s not blooming?
Not necessarily — a non-blooming plant can still be perfectly healthy. Christmas Cacti only bloom when they receive both short days (fewer than 12 hours of light) and cool nights (50–60°F) for 6–8 consecutive weeks in fall. If your plant has firm, glossy segments and is putting out new growth, it’s healthy; it just hasn’t received the right environmental cues to flower. Follow the dark-period method above to trigger blooms next season.
Why are my Christmas Cactus stem segments turning yellow?
Yellowing usually points to overwatering, too much direct sunlight, or nitrogen deficiency. Overwatered segments look pale and washed-out, often with a soft or mushy texture. If segments are yellowing but still firm, check your light levels and fertilizer schedule. Correcting the underlying cause early usually stops the spread.
How do I know if my Christmas Cactus is overwatered or underwatered?
Feel the segments. Overwatered phylloclades are mushy, translucent, and may detach easily at the joints — root rot has disrupted water transport. Underwatered segments are wrinkled and shriveled but still firm, because the cells have lost turgor pressure without decomposing. Check the soil too: overwatered soil is soggy and may smell sour; underwatered soil is bone dry and pulling away from the pot edges.
Why is my Christmas Cactus dropping buds before they open?
Bud blast is almost always caused by a sudden environmental change — moving the plant, a temperature swing, low humidity, a draft, or overwatering. The plant releases ethylene gas and aborts the buds as a stress response. Prevention is the only real fix: keep temperatures stable at 65–70°F, maintain humidity above 50%, and don’t relocate the plant once buds have formed.
How often should I repot my Christmas Cactus?
Every 2–3 years in spring, or sooner if roots are pushing aggressively out of the drainage holes. Go up only one pot size — these plants bloom better when slightly pot-bound. Use a well-draining epiphytic mix (50% potting mix, 25% perlite or pumice, 25% fine orchid bark) and water sparingly for the first week after repotting.