
Quick Answer: To grow an avocado from seed, suspend the pit in water using toothpicks (flat end down) or plant it directly in well-draining soil with the top third exposed. Germination takes 2–8 weeks. Seed-grown avocados take 7–15 years to fruit and won’t necessarily match the parent plant — most people grow them as handsome houseplants rather than fruit producers.
Growing an avocado from seed is one of those satisfying kitchen experiments that can quietly turn into a long-term houseplant obsession. Learning how to grow an avocado from seed is straightforward enough for beginners, but a few key details — seed orientation, temperature, and drainage — make the difference between a thriving seedling and a rotting pit. This guide covers everything from seed prep through ongoing care.
How to Grow an Avocado from Seed: What to Expect
Germination typically takes 2–8 weeks, with 4–6 weeks most common at optimal temperatures. The first sign of life is a crack at the base of the seed, followed by a taproot, then a shoot pushing upward.
Here’s the honest part: seed-grown avocados (Persea americana) take 7–15 years to produce fruit, and the fruit won’t reliably match the parent cultivar due to genetic recombination. Outdoor growing is limited to USDA Zones 9b–11. For everyone else — and honestly, for most people regardless of climate — these make excellent, fast-growing houseplants with bold tropical foliage.
Water Method vs. Soil Method at a Glance
| Toothpick-Water Method | Direct Soil Method | |
|---|---|---|
| Visibility | Watch roots develop in real time | No visibility until shoot emerges |
| Transplant shock | Possible when moving to soil | None |
| Rot risk | Moderate (manage with activated charcoal) | Lower with proper mix |
| Germination time | 2–6 weeks | 4–8 weeks |
What You Need Before You Start
Choosing the Right Avocado Seed
Any fresh avocado works — Hass, Fuerte, Reed, Bacon, Zutano. The seed should be firm and plump, not shriveled. Process it the same day you eat the fruit. Avocado seeds are recalcitrant, meaning they lose viability quickly once they dry out. Seeds from fruit that has been refrigerated for a long time in the store may already have chilling injury to the embryo, so freshness matters.
Equipment Checklist
For the water method:
– 3–4 toothpicks
– A glass or jar
– Activated charcoal (optional but helpful)
For the soil method:
– 4–6 inch terracotta pot with drainage holes
– 60% quality potting mix + 20% perlite + 20% coarse horticultural sand
– Seedling heat mat set to 75–80°F
– Clear plastic bag (optional humidity tent)
For both methods:
– Soil thermometer
– Full-spectrum LED grow light if your windows are limited
Seed Anatomy: Which End Is Up?
Get this wrong and nothing will sprout. The seed has two distinct ends:
- Broad, flat base = the root end → points DOWN
- Pointed apex = the shoot end → points UP
The radicle (embryonic root) emerges from the base; the plumule (embryonic shoot) pushes up from the top. Gravity reinforces correct growth, but reorienting from an upside-down position costs the embryo energy it may not have. When in doubt, look for the flatter, slightly indented end — that goes down.
Optional tip: Lightly sand the flat base with fine sandpaper (scarification) to encourage faster water uptake and potentially shave a week or two off germination time.
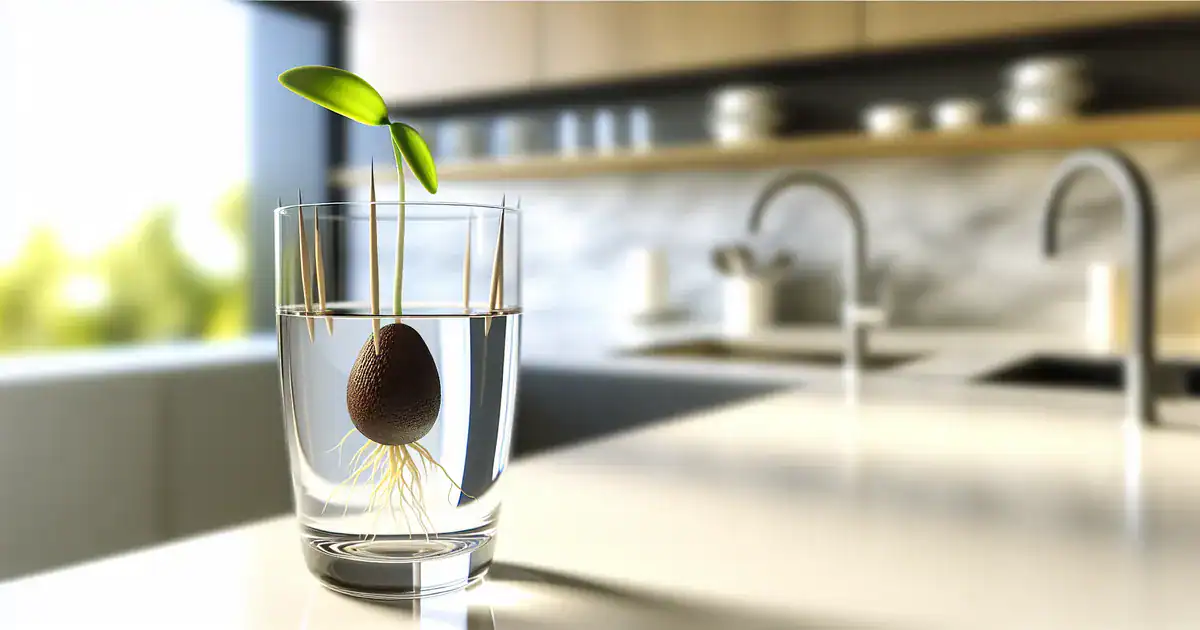
Step-by-Step: The Toothpick Water Method
Preparing and Cleaning the Seed
Gently rinse the seed under lukewarm water to remove any clinging fruit flesh. Use your fingers, not a scrubbing pad — you want to keep the papery brown seed coat (testa) intact, since it protects against pathogens during germination. Don’t let the seed sit on the counter for more than a day before setting it up.
Setting Up the Toothpick Suspension
- Insert 3–4 toothpicks around the equator of the seed at a slight downward angle to create a stable shelf on the rim of the glass.
- Rest the seed on a glass or jar filled with room-temperature water so the bottom third is submerged.
- Place in a warm spot out of direct sun — near a heat source is better than a cold windowsill.
- Add a small piece of activated charcoal to the water to inhibit mold and bacterial growth.
Maintaining the Water Vessel
Change the water every 2–3 days without fail. Stagnant water breeds the exact pathogens that will rot your seed. Top up between changes to keep the bottom third submerged, and keep the vessel away from heat vents and drafts, which can dry out the exposed upper half.
When to Transfer to Soil
Move to soil once the taproot is at least 2–3 inches long and the shoot has visibly emerged from the top of the seed. Pot into a 4–6 inch terracotta pot using the well-draining mix described below. Plant with the top third of the seed still exposed above the soil surface, base down. Water thoroughly, then care for it like an established seedling.
Step-by-Step: Direct Soil Planting
The Best Potting Mix for Avocado Seeds
Standard potting mix on its own holds too much moisture. Use:
– 60% quality potting mix
– 20% perlite
– 20% coarse horticultural sand
This drains fast enough to prevent rot while retaining just enough moisture for germination. Always use fresh, sterile mix — garden soil is not a substitute.
Planting Depth and Orientation
Use a 4–6 inch terracotta pot with drainage holes. Place the seed base-end down, burying the bottom two-thirds and leaving the top third exposed above the soil surface. This mirrors what the toothpick method achieves, just in a solid medium.
Watering, Temperature, and Light During Germination
Keep the soil consistently moist but never soggy — think wrung-out sponge. A seedling heat mat set to 75–80°F (24–27°C) under the pot makes a real difference in cooler homes. Place in bright indirect light. If you want to speed things up, loosely tent the pot with a clear plastic bag to trap humidity, removing it for an hour daily to prevent fungal buildup.
Don’t expect to see anything for 4–8 weeks. Germination is happening underground and won’t be visible until the shoot breaks the surface.
Avocado Seedling Care After Germination
Light: Why It’s Non-Negotiable
Avocados are high-light plants. A south- or west-facing window is your first choice. In winter or northern latitudes, supplement with a full-spectrum LED grow light providing 1,500–3,000 foot-candles for 14–16 hours per day. Rotate the pot 90° every week for even growth. Without enough light, seedlings etiolate — they stretch tall and pale, with long gaps between leaves and weak stems.
Watering to Prevent Root Rot
Water deeply when the top 1–2 inches of soil are dry. Pour until water runs freely from the drainage holes, then empty the saucer within 30 minutes. Avocado roots cannot tolerate sitting in water, even briefly. A soil moisture meter takes the guesswork out of timing, especially in winter when evaporation slows.
Temperature and Humidity
Keep your avocado between 65–85°F (18–29°C). Cold windowsills in winter can drop soil temperature 10–15°F below room air temperature, stressing the roots even when the air feels comfortable. Target 50–60% relative humidity — a pebble tray with water or a nearby humidifier helps in dry indoor environments.
Fertilizing
Hold off on fertilizer until the seedling has 2–3 sets of true leaves, roughly 6–10 weeks after germination. Start with a balanced 10-10-10 or 8-3-9 water-soluble fertilizer at half the recommended strength. Fertilize monthly in spring and summer, taper to every 6–8 weeks in autumn, and stop entirely in winter when growth naturally slows.
Pinching for a Bushier Plant
When your seedling reaches 6–8 inches tall, pinch off the growing tip just above a leaf node. This redirects energy into side branches and produces a fuller, more attractive plant instead of a single tall stem. It feels counterintuitive to remove growth, but the payoff is quick.
Common Problems and How to Fix Them
Seed Not Sprouting After 8 Weeks
Check orientation first — flat base down, pointed end up. Then verify soil temperature with a thermometer; below 65°F (18°C), add a heat mat. Confirm moisture levels are consistently damp, not wet or bone dry. If the seed coat appears to be hardening around an emerging root, gently loosen it with your fingers. A seed that smells off or feels completely hollow is likely no longer viable.
Yellowing Leaves
Two different problems, two different fixes. Nitrogen deficiency shows as pale green to yellow color on older, lower leaves. Iron chlorosis appears as yellowing between the veins on new growth — veins stay green while leaf tissue turns yellow. Iron chlorosis is caused by alkaline soil (pH above 7.0) locking up available iron. Fix it by adjusting soil pH to 6.0–6.5 using elemental sulfur, then apply chelated iron as a foliar spray.
Root Rot
Root rot is usually caused by overwatering combined with Phytophthora cinnamomi, an oomycete that thrives in waterlogged soil. Symptoms include wilting despite moist soil, yellowing, and brown mushy roots when you unpot. Trim all affected roots with sterilized scissors, dust cut surfaces with powdered cinnamon or sulfur, and repot in fresh sterile mix. For confirmed Phytophthora, a phosphonate-based fungicide (potassium phosphonate) applied as a soil drench is the most effective treatment.
Leggy Seedlings
A stretched, pale seedling needs more light — but don’t move it straight into full sun. Etiolated tissue is prone to sunscald. Increase light exposure gradually over 1–2 weeks, letting the plant adjust and green up before exposing it to the strongest light available.
Pests
| Pest | Signs | Fix |
|---|---|---|
| Spider mites | Stippled leaves, fine webbing | Insecticidal soap every 5–7 days; raise humidity to 50–60% |
| Scale | Brown bumps on stems; sticky residue | Alcohol swab to remove; horticultural oil to smother crawlers |
| Mealybugs | White cottony clusters in leaf axils | Alcohol swab + neem oil spray |
| Fungus gnats | Tiny flies around soil; root damage | Let soil dry more; Bti soil drench; yellow sticky traps |
Always isolate affected plants immediately to prevent spread.
Frequently Asked Questions
How long does it take for an avocado seed to sprout?
Most seeds germinate in 2–8 weeks, with 4–6 weeks typical when soil temperature is held at 75–80°F (24–27°C). The water method tends to show visible root growth slightly sooner, since you can watch the roots develop. Cooler temperatures slow the process significantly.
Will a seed-grown avocado ever produce fruit?
It can, but plan for a 7–15 year wait — and even then, fruiting indoors isn’t guaranteed without adequate space, light, and a compatible pollination partner nearby. The fruit also won’t reliably match the parent cultivar. Most home growers enjoy seed-grown avocados purely as foliage plants.
Why isn’t my avocado seed sprouting after 8 weeks?
The most common culprits are incorrect orientation (flat base must point down), temperature that’s too cool (below 65°F/18°C), and a seed that was already non-viable due to drying out or chilling injury. Check all three before giving up. If the seed feels firm and smells neutral, give it another 2–3 weeks with a heat mat in place.
Can you grow an avocado tree indoors permanently?
Yes, and many people do. Container growing and regular pruning keep them well below their outdoor height of 30–40 feet. They thrive as large houseplants or patio specimens in bright conditions. Fruiting indoors is extremely unlikely due to light limitations and pollination requirements, but as a foliage plant a well-grown avocado is genuinely striking.
Do you need two avocado trees to get fruit?
Technically one tree can self-pollinate, but avocados have Type A and Type B flowering behavior (dichogamy), where male and female flower functions open at different times of day. Having one of each type nearby dramatically improves pollination success and fruit set. With a single seedling grown indoors, the realistic chance of fruiting is very low regardless of age.
— in the water method equipment list, where the product is already being recommended.
2. — in the soil method equipment list.
3. — in the soil method equipment list.
4. — in the equipment list and again in the Light care section (two natural touchpoints for the same product).
5. — in the watering section, where the product is directly recommended.
Completeness
- FAQ section retains all 5 questions, each with a concise answer. No questions were removed or added.
Product Placeholders
- No raw … placeholders were present in the original article. All affiliate markers were already in HTML comment format and have been retained and tidied.
–>