
Quick Answer: Yes, orchids — especially Phalaenopsis — can grow in water. The two most practical methods are full water culture (FWC), where roots cycle between soaking and drying, and semi-hydroponics using LECA or pumice in a reservoir system. Both eliminate bark media and give you clear visibility into root health.
How to Grow Orchids in Water: The Two Main Methods
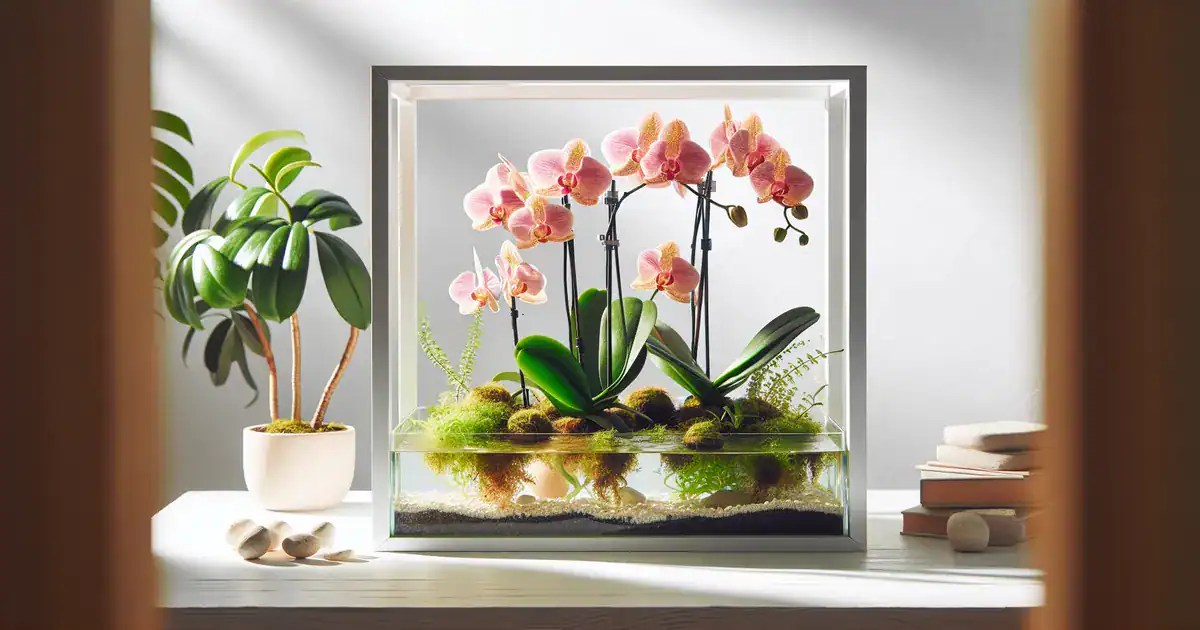
Water culture isn’t simply dropping an orchid into a vase. It’s a structured growing method that mimics the wet-dry cycles orchids experience in their natural epiphytic habitat — clinging to trees, soaking up rain, then drying out in open air.
| Method | How It Works | Difficulty | Best For |
|---|---|---|---|
| Full Water Culture (FWC) | Roots soak 2–4 days, then dry 3–5 days | Beginner–Intermediate | Phalaenopsis |
| Semi-Hydroponics (S/H) | LECA wicks water from a shallow reservoir | Intermediate | Most genera |
| Passive Hydroponics | Capillary action; similar to S/H | Intermediate | Phalaenopsis, Dendrobium |
Which should you choose?
– New to water culture? Start with FWC for Phalaenopsis — minimal equipment, fast feedback.
– Want lower maintenance? Semi-hydroponics with LECA gives more buffer against over- and under-watering.
– Growing multiple genera? Semi-hydroponics handles a wider range of orchids.
Why Orchids Can Grow in Water
The Epiphyte Advantage
Most popular houseplant orchids are epiphytes — they grow anchored to trees or rocks, not in soil. Their roots are exposed to open air, periodic rainfall, and rapid drying. This is why they rot in soggy potting mix but can thrive in a carefully managed water system. The key is replicating that wet-dry rhythm. Permanent submersion kills them; controlled soaking doesn’t.
How Velamen Radicum Works
Orchid roots are wrapped in velamen radicum, a spongy layer of dead cells that rapidly absorbs water and nutrients, then releases moisture as conditions dry. You can read this layer like a gauge:
- Silvery-gray = dry and ready to soak
- Bright green = fully hydrated
Beneath the velamen, the exodermis regulates ion uptake and acts as a pathogen barrier. Orchid roots also contain chlorophyll, so exposed roots actively photosynthesize — which is why transparent or semi-transparent vessels benefit plant health, not just aesthetics.
Best Orchid Species for Water Culture
| Genus | Suitability | Notes |
|---|---|---|
| Phalaenopsis | ⭐⭐⭐ Excellent | Most forgiving; ideal for beginners |
| Vanda | ⭐⭐⭐ Good | Naturally aerial-rooted; adapts well |
| Dendrobium | ⭐⭐ Moderate | Needs seasonal dry rest; complicates FWC |
| Cattleya | ⭐ Challenging | Requires very precise drying cycles |
| Paphiopedilum | ✗ Not recommended | Semi-terrestrial; highly prone to crown rot in FWC |
How to Set Up Full Water Culture (FWC)
Step 1: Choose the Right Vessel
- Use an opaque or semi-opaque container to limit algae growth.
- Aim for 4–6 inches in diameter for a standard Phalaenopsis so roots aren’t cramped.
- Avoid metal containers — they leach ions and destabilize pH.
- If you prefer clear glass, wrap the lower half in dark tape or paper.
Step 2: Prepare Your Orchid
- Remove all old bark and rinse roots under lukewarm water.
- Sterilize scissors or a blade with 70% isopropyl alcohol.
- Trim every brown, mushy, or hollow root cleanly.
- Let cut ends air-dry for 30–60 minutes.
- Dust cut ends with powdered cinnamon or horticultural sulfur as a natural antifungal.
Step 3: Add the Right Water
- Best options: rainwater, reverse osmosis (RO) water, or distilled water.
- Tap water works only if background EC is below 0.3 mS/cm. Letting it sit 24 hours off-gases chlorine, but not chloramine — if your municipality uses chloramine, you need RO or activated carbon filtration.
- Fill so only the bottom 1–2 inches of roots are submerged. Never submerge the crown.
- Keep water temperature between 65–75°F (18–24°C). Water above 85°F accelerates bacterial growth.
Step 4: Run the Wet/Dry Cycle
- Soak phase: 2–4 days submerged.
- Dry phase: 3–5 days out of water, until velamen turns silvery-gray.
- Adjust for humidity: above 60% RH, extend the dry phase by a day or two; below 40% RH, shorten it slightly.
Step 5: Fertilize
- Use a balanced, water-soluble fertilizer (20-20-20 or 20-10-20 NPK) at ¼ the label strength.
- Target EC of the nutrient solution: 0.5–0.8 mS/cm.
- Fertilize only during the soak phase. Use plain water for the final soak before each dry phase to flush accumulated salts.
- Follow “weakly, weekly” — dilute fertilizer at every soak rather than full-strength occasionally.
- When a flower spike emerges, switch to a bloom-booster formula (10-30-20) to channel energy into flowering.
Step 6: Maintain Water Quality
- Change water completely every 5–7 days — or sooner if you notice cloudiness or odor.
- Rinse the vessel with dilute 3% hydrogen peroxide monthly to prevent biofilm.
- Check and adjust pH at each change; maintain 5.5–6.5 using pH Up (potassium hydroxide) or pH Down (phosphoric acid).
How to Grow Orchids in Water with Semi-Hydroponics (LECA)
Semi-hydroponics sits between bark and full water culture. Roots sit in an inorganic medium inside a net pot, which rests inside a solid outer pot holding a shallow nutrient solution. The medium wicks moisture upward — roots get consistent hydration without sitting directly in water.
Choosing Your Inorganic Media
| Media | Pros | Cons |
|---|---|---|
| LECA | pH neutral, reusable, reliable capillary action | Needs thorough pre-rinsing |
| Perlite | Excellent aeration, inexpensive | Floats initially; pH 7.0–7.5 |
| Pumice | Great drainage, stable | Heavier; harder to source |
| Lava Rock | Excellent long-term stability | Very heavy; coarse texture |
LECA is the most practical choice for Phalaenopsis — reusable, widely available, and consistent.
Setting Up the System
- Pre-rinse LECA until water runs clear.
- Place the orchid in a net pot with roots nestled among the LECA.
- Set the net pot inside a slightly larger solid outer pot.
- Fill the outer pot with nutrient solution to ½–1 inch deep — just enough for capillary wicking.
- Keep the top 2–3 inches of LECA dry to prevent crown rot and algae.
Reservoir Maintenance
- Top up the reservoir as it depletes; don’t let it run completely dry.
- Flush the entire system monthly with plain RO or distilled water to leach mineral salts.
- Monitor solution pH; perlite can push pH above 7.0 over time.
- Replace LECA annually or when salt crust or biofilm becomes persistent.
Troubleshooting Common Problems
Slimy or Brown Roots
Cause: Bacterial biofilm from anaerobic conditions — water sitting too long or insufficient dry phases.
Fix: Extend the dry phase by 1–2 days. Sanitize the vessel. Add 1 ml of 3% hydrogen peroxide per liter during the next soak. Trim any mushy roots.
Green Algae on Roots or Vessel Walls
Cause: Light reaching the water.
Fix: Switch to an opaque vessel or wrap your current one. A monthly H₂O₂ rinse keeps walls clean.
Yellow Leaves
Cause: Wet phase too long (oxygen deprivation) or nitrogen deficiency.
Fix: Extend the dry phase immediately. If EC is below 0.5 mS/cm, increase fertilizer concentration slightly.
Root Tip Die-Back
Cause: High mineral content, fluoride accumulation, or fertilizer EC above 1.2 mS/cm causing osmotic stress.
Fix: Switch to RO or rainwater. Reduce fertilizer concentration. Raise ambient humidity to 50–70%.
Crown Rot
Cause: Water pooling in the crown or leaf axils, especially without air movement. Erwinia bacteria spread rapidly once established.
Fix: Keep the crown above the waterline at all times. Run a small oscillating fan nearby. If rot appears, remove affected tissue with a sterile blade, allow to dry, and apply dilute 3% hydrogen peroxide directly to the wound.
No New Root Growth After 8+ Weeks
Cause: Insufficient light, temperatures below 65°F, or nutrient deficiency.
Fix: Increase light to 1,500–2,000 foot-candles. If window light is weak, add a full-spectrum LED grow light (5,000–6,500K) positioned 12–18 inches above foliage for 12–14 hours per day. Confirm temperatures stay above 65°F.
Ongoing Care at a Glance
| Parameter | Target Range |
|---|---|
| Light | 1,000–2,500 foot-candles |
| Temperature | 65–85°F (18–29°C) |
| Humidity | 50–70% |
| Water EC | 0.5–1.2 mS/cm |
| Solution pH | 5.5–6.5 |
| Water change | Every 5–7 days |
Monitor humidity with a digital hygrometer — guessing doesn’t work. Keep orchids away from heating and air conditioning vents, and never use softened water; sodium ions are toxic to orchid roots even at low concentrations.
Frequently Asked Questions
Can all orchids grow in water?
No. Epiphytic genera like Phalaenopsis and Vanda adapt best because their roots evolved for wet-dry cycles in open air. Dendrobium and Cattleya can work with careful management. Semi-terrestrial orchids like Paphiopedilum are prone to crown rot in FWC and are better left in a well-draining bark or moss mix.
How often should I change the water?
Every 5–7 days — sooner if the water looks cloudy or smells off. Stale water develops bacterial biofilm within 24–72 hours at room temperature. Consistent water changes are the single most important maintenance task in FWC.
Why are my orchid roots turning brown and slimy?
Almost always bacterial biofilm caused by anaerobic conditions — water sitting too long or a skipped dry phase. Extend your dry cycle by 1–2 days, sanitize the vessel with dilute hydrogen peroxide, and trim any mushy roots. Don’t skip the dry phase going forward.
Do water-grown orchids still need fertilizer?
Yes. Water alone provides no nutrients. Use a balanced fertilizer at ¼ label strength during each soak, targeting an EC of 0.5–0.8 mS/cm. Skip fertilizer only when the plant is stressed, newly transitioned, or recovering from root loss.
Can I use tap water?
It depends on your water quality. Test EC first — below 0.3 mS/cm is generally safe after 24 hours of off-gassing (for chlorine only). If your supply uses chloramine, or EC is higher, use RO water or rainwater. Never use softened water.